
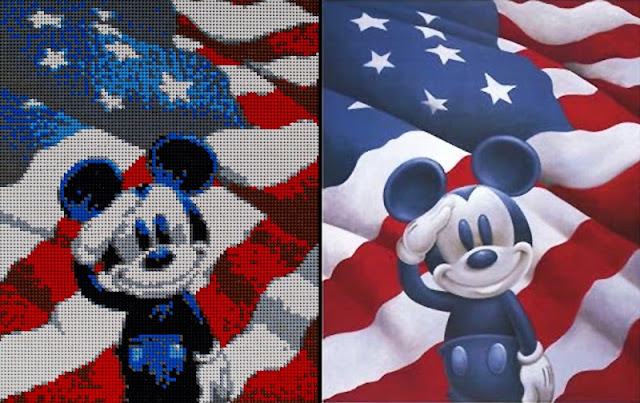
I had wanted to make some sort of Lego mosaic for a while now, but I couldn't figure out what kind of source picture I wanted to use. Whenever I tried it with people, the colors just looked pretty far off unless you did black and white. That's when I started looking at cartoons. My wife's office is full of Disney paintings we've done, so I knew she'd probably like a Lego Mickey mosaic. I found this source picture online titled "Mickey Salutes America" and decided it would be the perfect picture to make a mosaic out of.

I used a program called Mosaic Creator to generate the mosaic. For the input pictures, I used the color swatches of the Lego Bricks and set the output cell size as 1x1. For the total output size, I based it on the standard Lego base plate size of 32x32, and chose an output of 96x124. Doing the math, that meant there would be 96 studs * 124 studs = 11,904 studs.
Mosaic Creator will give an output file showing what each cell should be.
Mosaic Creator will give an output file showing what each cell should be.
[9,18] Light Bluish Gray.bmp
[9,19] White.bmp
[9,20] Medium Blue.bmp
[9,21] Dark Bluish Gray.bmp
[9,22] Medium Blue.bmp
[9,23] Medium Blue.bmp
[9,24] Dark Bluish Gray.bmp
[9,25] Dark Bluish Gray.bmp
[9,26] Medium Blue.bmp
[9,27] Medium Blue.bmp
[9,28] Medium Blue.bmp
[9,19] White.bmp
[9,20] Medium Blue.bmp
[9,21] Dark Bluish Gray.bmp
[9,22] Medium Blue.bmp
[9,23] Medium Blue.bmp
[9,24] Dark Bluish Gray.bmp
[9,25] Dark Bluish Gray.bmp
[9,26] Medium Blue.bmp
[9,27] Medium Blue.bmp
[9,28] Medium Blue.bmp
From there, I could have gone off and ordered 12,000 1x1 Lego bricks that were the correct color, but I wanted to take it a little further. Lego bricks certainly are not cheap, and even the cheapest 1x1 bricks are 4-5¢ each. Multiply that by 12,000 and you're looking at $600.00 just in 1x1 bricks. This project was starting to get a little expensive.
I knew that while 1x1 bricks were 4-5¢ each, you could also find 1x2 and 2x2 bricks for about the same price. My next goal was to find where I could combine sections of the mosaic and use larger bricks. I imported the list that Mosaic Creator generated into Excel and I wrote a program that would scrub the original and replace sections of 1x1 bricks with larger bricks. In the end, I was able to make a section that looked like this to this. You can find out more about the program I wrote here (link).
I knew that while 1x1 bricks were 4-5¢ each, you could also find 1x2 and 2x2 bricks for about the same price. My next goal was to find where I could combine sections of the mosaic and use larger bricks. I imported the list that Mosaic Creator generated into Excel and I wrote a program that would scrub the original and replace sections of 1x1 bricks with larger bricks. In the end, I was able to make a section that looked like this to this. You can find out more about the program I wrote here (link).

My program also told me how many bricks of each I would need to order.
From there, I went to a great site for buying Lego bricks in bulk called Bricklink. There are multiple sellers who have their own stores with a wide variety of stock, and in some cases pretty different prices. It was a little confusing at first to navigate but eventually I was able to find all the pieces I needed. There are some power sellers there where you could buy every single brick you needed but their prices are a little higher. In the end, I placed orders with 4 separate sellers and received my bricks within a week.
From there, I went to a great site for buying Lego bricks in bulk called Bricklink. There are multiple sellers who have their own stores with a wide variety of stock, and in some cases pretty different prices. It was a little confusing at first to navigate but eventually I was able to find all the pieces I needed. There are some power sellers there where you could buy every single brick you needed but their prices are a little higher. In the end, I placed orders with 4 separate sellers and received my bricks within a week.

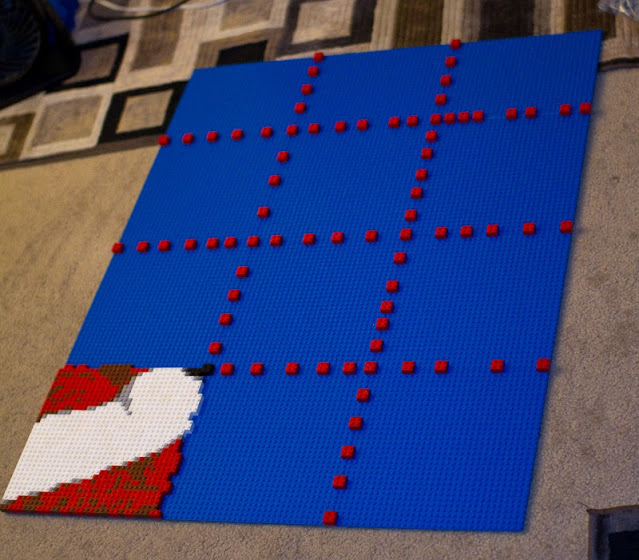
The next stop was to the Lego Store at Downtown Disney to grab some base plates. I also went to Home Depot to get some plywood to mount everything to and some glue because I knew I didn't want this coming apart.

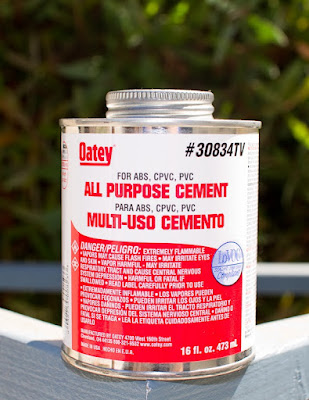
I read that the best glue to use to keep the Lego pieces from coming apart was a PVC glue called MEK that would slightly melt the plastic and then fuse the two pieces together. The glue came in black and clear, and while I started with the black I wasn't really happy with the results since it occasionally dripped or squished up to the surface. Also, I had read that the best way to apply it was to smear a thin layer on the base plate and then place the pieces. I found that when I did this, it melted the base plate too much, and the Lego pieces didn't fit flush next to each other. I eventually found that I liked dabbing the pieces individually on the glue brush before I placed it. This made it so there was just enough glue to hold them together, and they also snapped onto the board when they were placed.
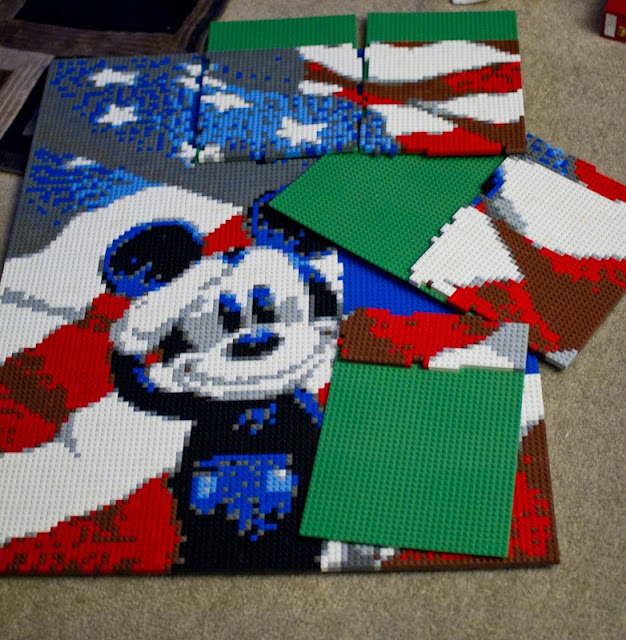
And here's the finished product.


Total cost:
- 1x1, 1x2, 2x2, 2x4 bricks including shipping = $205
- (12) 32x32 blue Lego base plates = $60
- Glue and plywood = $20
- Total - $285
Total Time:
~6 hours to assemble all the Legos
not sure how many hours it took for planning, ordering, etc.
~6 hours to assemble all the Legos
not sure how many hours it took for planning, ordering, etc.
All in all, this was a really fun project.
Will have to remember this one for Flag Day next year - June 14th. GREAT JOB, Joe !!
ReplyDelete